
A Knight By Your Side
The KNIGHT KT7000 is an advanced audio recorder and player for clear, high-quality audio capture and playback of meetings, classes, and other in-room recording needs. Its one-of-a-kind design combined with its lightweight size make it versatile audio recording device on the market, perfect for almost any situation.
IN THE BOX
- Audio Recorder
- Audio Jack Adapter
- Wired Earbuds
- Charging Cable + Plug

GET STARTED
Step 1: Charge the audio recorder by connecting the supplied USB cable to a computer port. After charging is complete, disconnect from the charging cable.
Note :
The RED light will stay on while charging. The GREEN light will turn on when fully charged.
Step 2: Turn it ON and begin recording by sliding the power switch to the left.
Note:
Immediately after switching the device ON, you will see either 3 short GREEN light blinks (if battery life is >10%) or 10 RED blinks (if battery life is <10%). The recorder begins recording immediately after the blinking stops.
Step 3: After you are finished recording, switch the device OFF which saves and stops the recording. You will see 1 short RED blink.
Step 4: Listen to your recording by either connecting the KT7000 to your computer using the charging cable or by connecting the included earbuds directly to the recorder. See more detailed instructions and tips on connecting your computer on the next page.
CRITICAL NOTE: Make sure the device is turned OFF before you connect it to your computer. If you do not turn it OFF, the computer will not recognize the device. Your recordings can be found in the “RECORDED” folder.
Step 5: Set the time stamp by connecting the recorder to your computer, opening the “SETTINGS” TXT file, updating the time & date, and saving the file.
Note:
You may also see more detailed time stamp setting instructions in the following pages.
Step 6: Enjoy the added benefits of having a KNIGHT by your side!
Note:
AFTER you have read this entire manual and watched our instructional video, if you still have questions or issues, please feel free to email us at Hello@KnightSecurity.io or call our customer support at +1 872-273-0057 and we will be happy to help.
CONNECT TO YOUR COMPUTER
Step 1: Turn the recorder’s power switch to the OFF position.
Step 2: Connect the audio recorder to your computer using the included cable
Note:
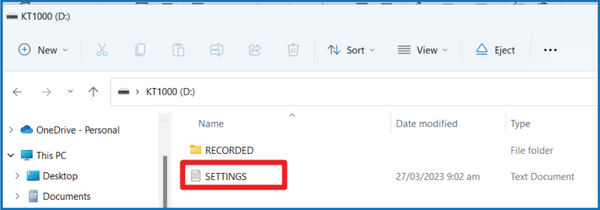
After connecting, you will see the below folder pop up. If you do not see this folder pop-up, then please manually locate your USB drive and open it.

SET THE TIME
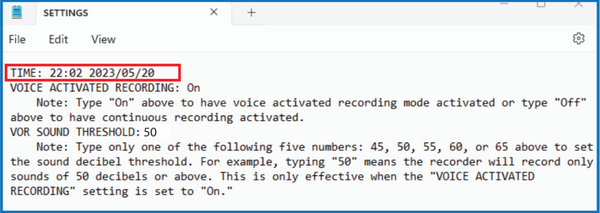
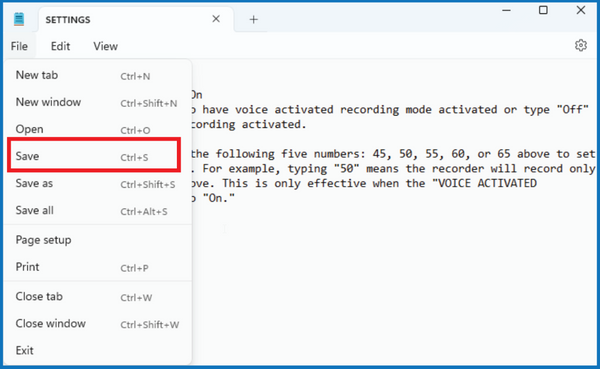
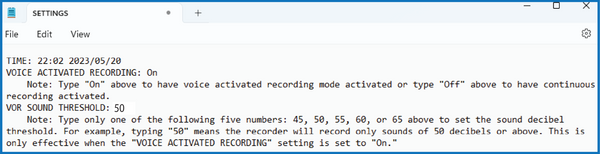
Step 1: Open the “SETTINGS” text file and type in the current time and date.
Note:
Use MILITARY TIME. For example, 9:30 pm would be entered as “21:30”. The format = hh:mm YYYY/MM/DD.

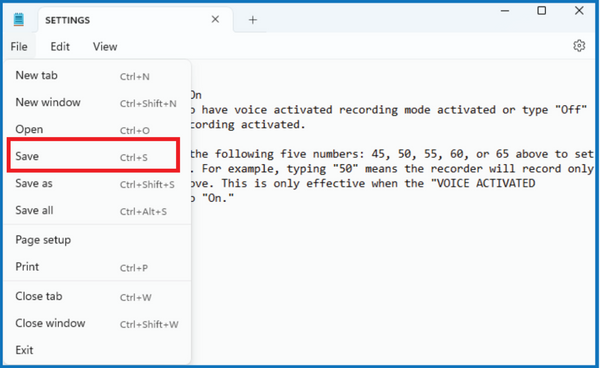
Step 2: Save the file by clicking the “File” dropdown and selecting “Save.”
TIME STAMP
After setting the time, the time stamp will be visible both in the name of the recording file and also in the “Date modified” section. The start time of the recording is included in the file name and the end time is shown in the “Date modified” section. See below.

Note:
After every 2 hours of cumulative recording time, a .WAV file gets saved automatically.
LISTEN TO YOUR RECORDINGS
Listen On the Computer
Step 1: Turn the recorder’s power switch to the OFF position.
Step 2: Connect the KT7000 to your computer.
Step 3: Open the “RECORDED” folder.

Note:
You will see your collection of audio recordings.
Step 4: Open your chosen audio file and listen.
CRITICAL NOTE: IF your computer’s default audio player does not work to playback the .WAV audio files, please use another audio file player. Recommended audio players include but are not limited to the following:
- WINDOWS MEDIA PLAYER (most popular, preferred option)
- iTunes (preferred option for Mac)
- VLC PLAYER
- GROOVE MEDIA PLAYER
Note 1:
It must be “Windows Media Player” not “Media Player”. Your computer may also say “Windows Media Player Legacy” (use this one).
Note 2:
To use a different media player, simply right click the .WAV file, click “Open with” and select / download one of the above recommended media players. See below.

DELETE YOUR RECORDINGS
There are 2 ways to delete the recordings off of the audio recorder.
- Simply connect to your computer, go into the “RECORDED” folder and delete the audio files in there that you wish to delete.
- On the earbuds, press and hold the play/pause button for 20 seconds. You will then see very quickly flashing red and green lights. Let go of the Play/pause button. Then press the fast forward button while the red and green lights are flashing to confirm the deletion of all recordings. If you do not press the fast forward button within 10 seconds, the pending deletion will be cancelled.
NOTE: THIS WILL DELETE ALL RECORDINGS.
Note:
Pressing the “Reset” button on the outside of the recorder WILL NOT delete your recordings. It will only restore settings to the factory default.
Listen Using Earbuds
Step 1: With the recorder turned off, connect the earbuds to the included adapter cord and connect the adapter cord to the recorder.
Step 2: Turn the power switch to the ON position. The GREEN light will flash continuously to indicate that it is in playback mode.
Step 3: Listen. Your recordings will begin playing automatically.
Step 4: Press the ![]() button to pause/play the recording.
button to pause/play the recording.
Step 5: Press the + button to increase the volume.
Step 6: Press the - button to decrease the volume.
Note:
You will hear a beep sound when adjusted to the minimum or maximum volume.
Step 7: Press the ![]() button to switch to the next recording. Press and hold the
button to switch to the next recording. Press and hold the ![]() button to fast forward.
button to fast forward.
Step 8: Press the ![]() button to switch to the previous recording. Press and hold the same
button to switch to the previous recording. Press and hold the same ![]() button to rewind.
button to rewind.
CHANGE THE SETTINGS – VOICE ACTIVATED RECORDING
This audio recorder gives you the option of recording continuously (i.e., recording non-stop even if there is no sound) OR recording with voice-activated recording (VOR) mode (i.e., only recording when there is greater than 45 decibels of sound). The default recording mode is VOICE ACTIVATED RECORDING.
Step 1: Open the “SETTINGS” text document.
Note:
You will see the following text: “Voice Activated Recording: On”
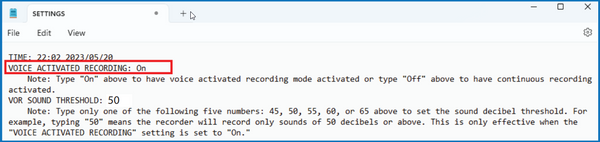
Step 2: Leave it set to "ON" to have voice activated recording mode activated or type "Off" to have continuous recording activated.
Step 3: Click “File” then “Save.”
CRITICAL NOTE: Recordings made with VOR will be saved with “V” at the beginning of the file name. Recordings made with normal recording will be saved with “R” at the beginning of the file name. See the below pictured example.

CRITICAL NOTE 2: When using voice activated recording mode, if there is no sound above 45dB detected for 6 SECONDS IN A ROW, then the recorder will stop recording. It will start recording again 0.5 seconds after a sound above 45dB is detected.
Note:
After 2 hours of total recording time, a .WAV file gets saved automatically. For example, if the device records for 10 hours over the course of 2 days, there will be a total of 5 .WAV files created during that 2 day time period.
CHANGE THE SETTINGS - VOR SOUND THRESHOLD
This audio recorder also gives the option of selecting at which decibel (i.e. sound) level the device will begin recording when it is in voice activated recording mode.
Step 1: Set the “VOR SOUND THRESHOLD” to either 45, 50, 55, 60 or 65 so that the recorder will record only when sounds above that decibel level are detected.
Note:
This is only effective when the "VOICE ACTIVATED RECORDING" setting is set to "On."
Note 2:
People speaking registers normally between 55-75 decibels.
CAUTION! DO NOT DAMAGE YOUR DEVICE!
CRITICAL NOTE: Please always make sure to SAFELY EJECT your audio recorder from your computer after you are done using it. Simply unplugging the device from your computer may cause some of your recording files to get lost, or damage the audio recorder drive to the point where you cannot access your recordings anymore. To safely remove it, follow the below simple steps:
Step 1: Click the eject button pictured below.

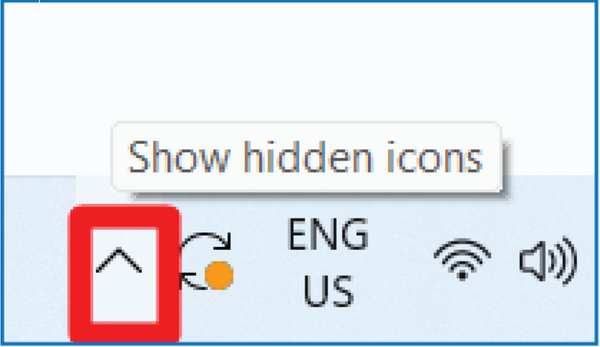
Step 2: If step 1 was not successful, you may click the “Show Hidden Icons” button on your taskbar. Depending on your computer, it may look like this.
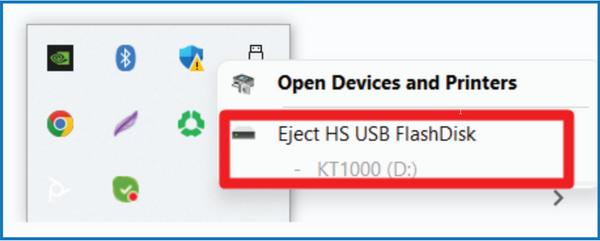
Step 3: Click on the “Safely Remove Hardware and Eject Media” icon.

Step 4: Click on “Eject HS USB FlashDisk.”
CHARGING, BATTERY AND STORAGE
Low Battery: If the battery has less than 10% left, 10 seconds of RED FLASHING LIGHT upon first switching on the recorder will be seen. If the device flashes red upon first turning on for 10 seconds, it is recommended that the device be charged.
Battery: The KT7000 KNIGHT audio recorder contains a 280 mAh battery which allows it to record non-stop for about ~2 full days before turning off and needing to be re-charged. If used in VOR mode, the battery will last a bit longer. If the device ever runs out of battery, it will save the last recording automatically before shutting down.
Charging: Charge your recorded with the provided cable. It will take 2 to 3 hours to become fully charged.
Storage: The KNIGHT KT7000 contains a massive, built-in 128GB storage capacity which equates to around 1600 hours (about 67 full days!) of total recording time. If the storage capacity ever becomes completely full, the device can no longer record and you will need to delete some recording files in order to create some more storage space (which will then enable recording again).
TIPS AND TROUBLESHOOTING
- This recording device is very sensitive. Avoid placing it on surfaces that vibrate to reduce static and fuzz in the recordings.
- Contact with the recorder during recording may cause static or noises over the recording.
- For the cleanest and clearest recording, it is recommended to have the holes uncovered and in a stationary location (i.e., peaking out of a pocket, inside a purse yet not completely covered, etc.).
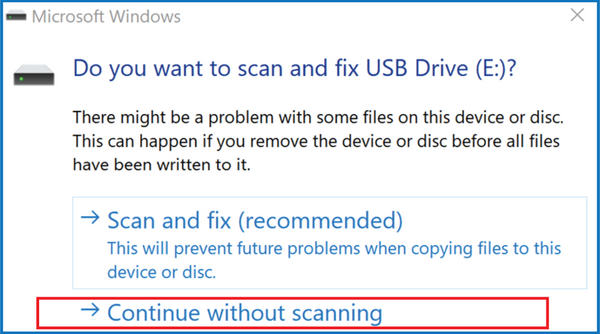
- In the event of receiving the below pictured pop-up, please select “Continue without scanning.”
USE AS AN MP3 PLAYER
This KT7000 audio recorder may also be used as an MP3 player. You may copy both .WAV and .MP3 files (i.e., your favorite music) both from the recorder to your computer and from your computer to the recorder.
Step 1: Please copy files into the “RECORDED” folder in order to listen to them with headphones.
Note:
Whichever files are located in the “RECORDED” folder are available for playback on your KNIGHT KT7000.
Note 2:
The RED and GREEN lights will flash when transferring data between your computer and the recorder.
Step 2: Plug in your headphones and listen.
CONSIDERATIONS & PRECAUTIONS
- DO NOT use this KNIGHT KT7000 audio recorder in an unlawful or unreasonable manner. Please only use in a way which is compliant with the prescribed laws of your region.
- DO NOT disconnect the recorder from the computer while transferring data.
- DO NOT listen to playback at high volumes to avoid damage to your hearing.
- DO NOT open, or modify this product.
- DO NOT use near water, wet environments, hot, cold, or dusty environments.
- Turn the power switch to the OFF position when storing the recorder.
- Back up the recorder’s data on your computer before storing it.
- This product contains small parts. Keep out of the reach of children.
PRODUCT SPECIFICATIONS
| Model | KT7000 |
|
Dimensions |
3 x 1 x 0.5 inches |
|
Weight |
1.8 oz |
|
Battery Size |
280 mah |
|
Battery Life |
~2 Days |
|
Storage Capacity |
1600 Hours |
|
RAM Storage |
128 GB |
|
Recording Format |
WAV |
|
Recording Quality |
192 kbps |
|
Battery Charging Time |
2 - 3 Hours |
| Sampling Rate | 48 kHz |
|
Playback Format |
WAV/MP3 |
| Exterior Material | Zinc Alloy |
| Interface Type | USB Type C |
| System Compatibility | WIN XP, WIN 7, WIN 8, WIN 10, IOS system, Linux |
| Signal-to-Noise Ratio | 90 dB to 95 dB |
| Operating Temperature | 23°F - 104°F |
WARNING:
This product can in no way guarantee any outcome including but not limited to
your health or safety. Please do not depend on this audio recorder alone. For more information, please go to www.KnightSecurity.io.
LEGAL DISCLAIMER:
The use or misuse of this audio recorder is conditioned upon the user’s agreement that in no event shall the manufacturer, importer, reseller, or distributor of this audio recorder be liable for any direct, indirect, punitive, incidental, special consequential damages, to property or life, whatsoever arising out of or connected with the use of this audio recorder.